
How To: Mail Christmas Cards

step 1: Order (bid on) 30 used Christmas cards originally created and sent in 1944 (or any ebay cards will do).

step 2: Buy glitter. Lots and lots of glitter. Throw in a bit of paper, some paintbrushes, glitter glue (yes, they make glue specifically for glitter), and get your addresses in order. (I promise you are missing a few.)

step 3: Cut the 1944 cards apart with the front page separated from the rest of it. Sometimes you can get multiple "front pages" out of one card.

step 3: Resize store bought blank stationery to fit the 1944 cards, because they are sooo not the same size. You will probably need to figure out how to rip in a straight line, since the blank stationery doesn't have a straight edge. Don't mess up! (You may think you have more cards than you need, but you are sooo wrong!)

step 4: Find the envelopes you used for thank you notes when you got married, since you never used them all. (Plus, they are made out of fancy, thick, textured paper that matches your the stationery you are gluing the 1944 Christmas cards to.)

step 5: Figure out how to type your home address on the envelope flap so that it is centered with a typewriter. Get your husband's help, because he's good at math and you don't feel like wasting tons of expensive envelopes (or your time).

step 6: Type your address on the back of 40-some-odd envelopes thinking that is enough (or too much) since you only bought 30 cards on ebay.

step 7: Glue the front of the old 1944 cards to the front of your new cards. Hopefully it looks pretty.

tip: Rubber cement the back of the image and the front of the card where you want the image to go. Wait until the rubber cement FULLY dries. When you go to place the image on the card, you will be able to move it around like a sticker if you mess up. (Also, don't ask Justin to show you this technique.)


step 8: Pull out all of your stamps. Since you are using older "vintage" stamps, you will need to add up the cost of postage for each envelope. Plus, you will want to pick color schemes that match your cards. This will only take a few hours.

step 9: Get the husband to tie ribbon around some of the cards to dress them up. Discover that despite having taught you how to tie a perfectly flat ribbon on wedding invitations, he has somehow lost that skill. Realize that you will be doing the tying –along with everything else that makes these cards special and unique– by yourself


step 10: Time to glitter! Screw up the first few cards with too much glitter before you decide to make a trip to Wal Mart to buy paint brushes. Use aluminum foil and put the tiniest bit (not too tiny!!) of glitter on it. (Use different color glitters if you have them.) Water down the glitter glue so that not all of the glitter sticks to the card. (Too much glitter looks like a 4 year old did it!) Tap your paintbrush in the glue, dab the brush on a paper towel (or foil) to get most of the glue off and then stick the brush in the glitter. Paint on your card. Smaller brushes give you finer detail and fan brushes allow you to create specks of falling snow.

step 11: Write something sweet in all of the cards.
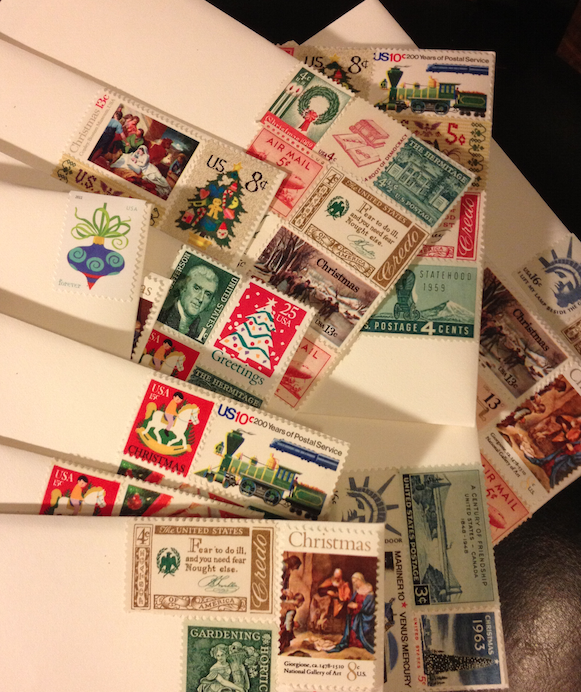

step 12: … After 4 days of working on the cards, be excited to finally finish! Put everything up. Then receive an e-mail with 2 more addresses and realize you have to pull it all back out again. *groan*

step 13 (the most important): Be unable to sleep and go crazy because the dining room is a wreck until you finish. Stress out. Pull your hair out. Scream. Cry. Wish you had started this project 5 weeks earlier. Then be glad you finished before your husband completed his 3-day holiday cake. ;)


I think I'm going to fall asleep now. :) Maybe I'll show you some of the DSLR card images after Christmas.

Anthropologie Storybook Tea Towels


Remember when I said we spotted a roach in our kitchen cabinets?

That's what our house has looked like for the past 2 days, except worse. Kitchen supplies and utensils EVERYWHERE!

Luckily, as of last night it has (mostly) been put away. I was really hoping to help Justin go through the kitchen supplies as we were putting them away, but I got called to the computer for some last minute work.

When I finally finished my work, Justin had already moved on to fixing a flat tire on his bike. Since we had received three 9x9 frames in the mail from Art to Frames, I knew exactly what I wanted to do. :)

Remember these?

image from Under the Sycamore
I did this:


And then cute artwork existed.

I set them leaning against the wall on the very top of the couch. Justin commented they would fall on him when he sat down. I agreed mentioning that then they would be "angry birds" rather than cute birds. ;) These birds make me smile whenever I look at them. They are just sooooo cute!

We are still trying to decide where they will go, but we feel like we've made a step in the right direction by framing them! (FYI: You may want to go with a bigger frame then 9x9 if you decide to buy these kitchen towels too.)

Anthropologie's Storybook Romance Kitchen Towels

What I think is so amusing about these towels is that if you go check out the reviews on Anthropologie's website, you see that, along with getting these towels for newlywed couples, people are also getting them for crafts (such as pillows, pinboards, etc. . .).


Plus, who can resist that adorable tag on the towels?!

The wood frames from Art to Frames I picked are here. I was afraid to go with white for fear it would look too similar to the towel, but I didn't want to go with something really contrasty like a black or brown. The white on pine looks most like my top picture. It stands out, but it's not an eye sore like my last image indicates with that bright yellow color. Eek!

Have you gotten into the whole craze of framing things that weren't designed as art? Do you love the Anthropologie tea towels as much as me? Where do you think we should hang them?

Weekend Recap + Gardening

Don't you just love the spring?! The lovely weather, the beautiful flowers...


Justin and I had a pretty awesome weekend. We spent a great deal of time in Dalton, the carpet capital of Georgia (or so they say) picking out the carpet we will make into a rug. Then, on the way home, we stopped in Marietta and walked around the square shopping in antique and thrift stores. It's definitely one of my favorite places to roam.

The following day, before starting work on our garden, we went to one of my favorite places for breakfast and ate the most delicious peach pancakes with homemade whipped cream. Yum!


Our garden came together pretty quickly. We focused on planting just a few vegetables (fruits?) that we frequently consume, specifically tomatoes, okra, zucchini, squash, and basil. I can't actually say I helped much with the planting, but I did have a lot of fun taking pictures at the local Home Depot in the garden section. (Poor Justin had to garden shop alone as I was a bit distracted.) Plants were on sale for $2 a pot, so we quickly filled our buggy with approximately 3 of each type we wanted. (Apparently it's best to plant in 3s?) 


Of course, we also bought a few other things while we were there including mats for the front and back doors. It gets pretty tiresome sweeping and vacuuming up all of the dirt, grass, etc... that gets brought in on our shoes. Hopefully the mats will prevent that from being such a problem in the future.


By the end of the weekend, our garden was completed and we were quite happy although somewhat tired. We are now impatiently waiting for the vegetables to grow, so that we can start saving money at the grocery store and enjoying delicious homegrown vegetables. I'm not sure there is anything better. :)

Iphoneography & Five Awesome Camera Apps

So after doing such fun posts yesterday, I had no idea what to post today... except that I am IN LOVE with a picture I took and edited on my phone (BluxPhoto, Instagram, and Picstitch). Apparently this month I am obsessed with images. 

With this shot, I just had to keep repositioning myself in front of these roses, so that neither artwork nor doors nor kids were in the shot. I didn't think it was working... I didn't think I was getting the flowers saturated enough... and then I threw it into instagram and I think "Ok... This is working..." THEN I throw the image into picstitch thinking I'm going to create a combined image along the theme of "Roses are red, violets are blue..." (Why not purple? ... I had a picture of purple flowers as seen below that I was going to use in a 3 picture template.) but as I went to do that, this magic thing happened with the roses. I can't even explain it. (Filters in Picstitch.) All of a sudden my image was crazy saturated red... and white (or grey)... and... perfect in a completely imperfect I-can't-believe-it's-not-butter way. 


As mentioned above... I also shot and crazy saturated some purple flowers...


But then the rain came and I had to go inside. Instead of giving up for the day, after I left work, as I sat in my car waiting for the rain to stop, I saw flowers and ivy through my raindrop covered window which I had to shoot. Other than being dreamy and out of focus, this shot makes me happy. Rain should always make the world dreamy and out of focus. And yellow. (But yellow equates to happiness, right?)


So anyway, I thought I would take a moment to share my five favorite Iphone Camera apps.

1. BluxPhoto - This is currently one of my favorite apps for capturing images. There are SOOO many options for capturing photos that I can't even begin to tell you all of them. I usually shoot on auto or macro mode. I do love using the Delhi filter since it often seems more saturated than auto really allows. There are options to shoot with the camera facing out... or in... And my true love, behind having a focusing point that you touch when you are ready to take a photo, is that you can see a histogram of your image as you are shooting. Being a crazy Photoshop person and having studied histograms more than I care to mention, it is an awesome way to make sure you are getting the brightness/darkness you want as well as keeping your color in check. Like I said, there are so many options within Blux that I have no idea about, but I can say that, even with my limited Blux knowledge, it makes it hard to ever think about going back to the regular iphone camera.

2. ProHDR - As the next one on my list, this is my next go-to camera app. Don't even get me started about how much I dislike iphone HDR. ProHDR doesn't always get the image right, but more times than not I find it obtains two pictures with the right amount of light in each. (Obviously one image is dark and one is light.) I have taken so many images with this app that I love, I'd have a hard time not recommending it.

3. DMD - If you need to capture panoramas, this is the best app I've found for that. Basically you hold your phone vertically and press the "start" button making sure the blue and white half circles meet as you work your way around the scene. When you are done, you press the "finish" button. Originally these pictures would save in your photos folder, but now you have to make a point of saving them to your photo folder. Yuck. (Please fix this DMD.) I've definitely gotten some fun panoramas with DMD. Just make sure to hold your phone as steady as possible when turning it otherwise you may end up with a few "bumps" and "hiccups" in your photos. 

4. Instagram - Please tell me you know about Instagram! :) Okay, so if you don't... Instagram is a fast photo editing program that uses filters to make your photos look... more saturated, old, less saturated, black and white, sepia toned, etc... It's not amazing on it's own, but it is fun when you don't have photoshop on your phone! Plus it's a quick and easy way to share photos with friends and family. You can easily post your pictures on twitter, facebook or e-mail them. 

5. PicStitch - Less a photo taking or editing app, Picstitch allows you to edit photo templates making it easy to fit multiple photos into a small square or rectangle for using in instagram, showing before/after, or even posting multiple images all at once rather than posting one image at a time (great for an event). It's fun, and it's free. What more could you ask for?

The Honorable Mention goes to Nightcap. If you have issues taking images in low light settings with your iphone, this may be the app for you. Because it uses longer exposure times, you need to hold the camera as still as you possibly can. The nice thing about this app is that it shows you the shutter speed and ISO. Unfortunately, this app confuses me. I never know if my image was taken or when I can move my phone again. Ack! The app seems to get stuck after taking a picture. As soon as you move the phone, it comes back to life, but, like I said, that doesn't really help me in determining if my shot was taken. (Nightcap, help?!)

So there you go... Five awesome iphone apps for shooting beautiful images, editing, and sharing with your friends. (You know you want to!)

** I have not been compensated for my opinions. My opinions are my own, and I love using these apps.
*** If you steal my photos, I will find you and murder you. I promise. However, if you want to repost my photos giving credit to me, you are free to do so.

Busy, Busy Weekend (Cleaning & Organizing)

First of all, let me talk to you all about Justin's and my budget for February. Despite our best efforts, we were unable to stay on budget in all areas. (Unfortunately, one cannot control variances in utility bills for broken appliances.) We did handle our food budget better though despite still being over. We were able to put more money toward our credit card payments than originally expected, so YAY!!! (I consider that a success, even in the smallest sense of the word!)

And while it seems counterproductive, Justin and I went to Ocho, a fabric store in Atlanta to take advantage of their 42nd anniversary sale. We looked at rugs that were being sold for a quarter of their usual price. We also looked at fabric that we were considering for homemade curtains. We're going to have aqua curtains with liners! (Justin is going to get the fabric today. We were a few days early for the sale this weekend.) Yay! I'm so excited Justin agreed to let me decorate the house with my favorite color!


Don't you love our new rug? ;) Actually, I read about designing a paper rug (typically done with newspaper) to determine exactly how big you want/need your rug to be. Justin and I have decided on purchasing carpet and getting it sized to 7 x 11.3 feet. Justin decided our rug, when we get it, should be the golden ratio. It sounded awesome to me. :)


While we were too early to buy the designer fabric, we weren't too early to get some placemats on sale for $.50 a piece. (Forgive the awful phone photography.) I thought these placemats would be nice when I eventually get the beautiful aqua china I want and decorate. In the meantime, these will be stored away. (Despite not needing them, we couldn't refuse $.50 placemats. That just seems unheard of!)


Justin's parents gave us a straw holder with the most ugly green top. I immediately pulled out my paints and got busy altering it to my taste. What you are looking at is the straw top with a fresh coat of turquoise (plus white) paint on it. I'm hoping a coat of a gloss paint will bring it around and make it look better, but we will see. For now, it is a work in progress. It is definitely a step up from what we were using to hold straws.


We also started working in our spare bedroom to get ready for our May guests. Justin put a peg board on the back of the spare bedroom door to hang sewing stuff. It makes it easier for him to get to and use. While he was doing that, I was sorting through sewing stuff (and some craft supplies) to organize one of our drawers. Considering what a mess it was, I thought I did a pretty good job. In this picture, it is currently missing a tupperware that I will use to store more things. (The tupperware needed to be cleaned.) Plus, I'm certain more sewing supplies will find their way on to the peg board. We will need more room in the drawer for craft supplies I'm sure. Most of my arts and craft supplies are still at my parents house, so it was really a big deal to get the sewing stuff organized.

Next up we will get to go through Justin's electronics and decide which pictures to hang. We're getting through it though! I can't wait to show you all the end results of our efforts before our friends come to visit. I'm certain it will look amazing! :)

By the way, anybody have any awesome ideas for storing cds and/or patterns? I'm looking for a way to store them on a bookshelf or the like without leaving it looking like a mess. Something that is easy to do (cheap) and easy to keep up. Ideas?

Christmas Crafts

Apparently, this week's posts are all about saving money!

This week Justin and I have been discussing how best we can save money and yet still decorate for Christmas. Let me share some of our ideas:

1. Instead of buying a Christmas tree, we are going to borrow a fake tree. As exciting as a real tree? No. Can we focus on giving instead? Yes.
2. As I shared in the last post, we have been shopping for Christmas gifts since August looking for the best deals. We have used coupons, gift cards, and money I have made through doing online surveys to save money. :)
3. As one of our Christmas gifts, a family I babysit for has offered to pay for a mailbox decoration for Justin and I. I am so excited about this gift in particular since the money used to purchase the mailbox decoration is also a donation to children's healthcare. I couldn't have asked for a more thoughtful, better gift from this family! :)
4. Justin and I are planning on making all of our Christmas ornaments using things around the house. (Don't tell him I told you.) We got a lot of ideas from Pinterest.
5. I am super excited about making this wreath for our front door. It looks nice yet cheap and easy enough to do.
6. I bought my Christmas party dress a month ago which leaves more money for whatever else is necessary (gifts, food, etc...) this month and next.

The only thing Justin and I are not skimping on this year are our Christmas cards. I took an awesome picture a couple of years back that we will be printing on some high quality cardstock from a professional photo studio. We are also planning on jazzing up our card sending by using Christmas stamps. :)

Ok... that and some Christmas pictures taken with Justin's immediate family that we hope to include in our Christmas card. :)

How are you saving money this Christmas?

Programs

Honestly, this was one of my FAVORITE parts of the wedding planning process. I spent sooo much time planning out the invitations and save-the-dates that it almost makes me sick. Do you know how little time I spent planning the programs? Do you know how much more proud of the programs I was than any of the other wedding paper products?

First we started out with paper. Thick paper. Program paper. 

Or maybe we started with the actual program. I don't remember.

Not being Catholic, I had to spend a lot of time on the wording and researching other Catholic wedding programs. Originally we were working with Father Tim, but he ended up having to do something for the archdiocese on the same date as our wedding. It was sad, but we scampered to find another priest to fill in. We ended up not even having a priest officiate which worked out quite well for us.

Point being... I had to e-mail him and the church coordinator about the wording and events within a Catholic wedding (that did not include communion). I needed to make sure I included all of the prayers and everything that needed to be said since only a few of Justin's friends and my dad's side of the family were the only to have ever experienced Catholic mass before.

Meanwhile, the wording for Catholic mass got changed as we were planning the wedding making things even more confusing. Ahhh!!!

So anyway, the program was double sided beginning with a cover page (including our names, the church name, the date, and the time) and ending with our thank yous and remembrances. We also made sure to include the names of everyone involved in the wedding mass including readers, singers, and ushers that were not necessarily standing with us at the front of the church during the mass.

I used a similar type to that which had been used on our invitations and save-the-dates.

My favorite part was the outside of the program. Justin had sifted through and bought a bazillion(!!) blue flowers from Ikea for our floral arrangements that I had NO IDEA what we were going to do with them! In January, I had bought a TON of ribbon from Hancock Fabric on sale that I also did not know what I would do with. So it came together. My mom and I spent 2 days cutting flowers, ribbon, and using a glue gun. *ugh* SOOOO TIME CONSUMING! But it looked so pretty, and I was sooooo happy with it! I was really afraid that all of the programs piled on top of one another would lead to flat flowers, but luckily this did not happen. On top of it, Justin (yes, Justin) had to teach my mom and I how to tie the bows so they would lay pretty. (Justin knows how to do everything! It really is scary occasionally. Apparently he learned this skill on a "How to Correctly Tie Your Shoe" website. Go figure. lol.)

At the same time as we were gluing flowers and tying ribbon, we were also poking holes in the pages of the program and sewing the books together. (Also very time consuming. So glad my dad was able to help!) Finally, we glued pockets inside the program covers to hold the map and information about the reception site. (The church coordinator had suggested the use of pockets to make church clean up easier. She said inserts typically get left at the church in the pews as they fall out of the programs. Then you have guests that can't find their way to the reception site! It probably didn't help that I had left the reception site as a surprise to everyone except out of town guests, immediate family, the wedding party, and the vendors.)


The one thing major that we did to the programs, that was even a surprise to me, was include two birds and a heart sitting on the ribbon that went around the back of the program.


My mom used to joke when I was young that if we saw birds sitting on a power line that they were having a meeting. I had a bird hole punch I bought for the wedding not knowing if I could use it. (Yes, they are technically black birds that I punched as blue.) Anyway, I was just playing around and being silly when I discovered that this could be a fun and unique way to personalize our programs without losing the class I was hoping to achieve. So my mom cut out approximately 300 "blue birds" on some thick blue paper while I used my Silhouette Cameo to print 150 hearts. Then my mom got to work gluing. I figured not many people would notice, but I was amused... Justin was amused. Everybody who knew anything about this little touch was able to notice and be amused.

Overall, I was so proud and excited for my guests to see our wedding programs. A lot of time and love went into them. I felt involved in every detail... and yet I felt like everything just came together.

I don't really have any suggestions for creating your own wedding program except to have fun. The minute you start worrying about copying somebody else or not being creative enough, you will probably get locked up and not be able to imagine what it is you want. Worst case scenario: call me.

Chandelier

© Marion Needham

I just wanted to share this picture of the completed chandelier. Remember how Justin was working on it in October? I think it turned out quite lovely. :) (I love how the lights in the background look like stars.)

DIY Reception Music

Ok future brides, I know what you are thinking. . . "I'll do the music thing later. It won't take very long."

ARE YOU KIDDING ME?!

No, I suppose the music did not take as long as finding a dress, finding a venue, working out the wedding day menu, or scouring Goodwills, antique stores, and yard sales for china, but putting music together is not the most simple task either if you do it right.

We started putting together our music approximately two months ahead of time thanks to the suggestion from one of our planners. Otherwise I may have waited until a week before!!!

Luckily I knew what we were going to be playing -- jazz. An odd choice, I know. It's something you only see done in movie weddings. I love jazz though. It's fun. It's romantic. Plus, I took a class on it in college. I knew my grandparents would love it, my friends that love to swing dance would love it, and it is just some very relaxing music. (I had a few friends argue for rock and pop. Yuck. Not my style at all.)

First we nailed down what music the venue had available for us to use. Then we nailed down what we had available. Then the search started. What was popular in the 30's and 40's? I looked at Billboard charts, looked for lists of popular jazz music that were played at weddings, and asked my grandparents and friends that were familiar with jazz for song artists and names. We went looking at music stores for used cds we could get for fairly cheap from a variety of different jazz artists. I listened to music snippets online to determine what I wanted to order from Amazon. I think we spent approximately $200 on jazz music that would last for approximately 5 hours. (More is better. Plus, we were only playing approximately 2 songs from each artist.) For fun, we also included a few songs for the kids ("Everybody Wants to Be A Cat" and "Dynamite").

The conclusion: everybody loved our music! My time paid off! As Justin and I were leaving our reception site, our wedding coordinator told us the music made her feel like dancing! :) It was very relaxing and calming after a stressful couple of months prior to the wedding.

The kicker: I still listen to and enjoy our wedding mix! :)

Day #513

Ok, so I am exaggerating a bit when I say that the planning day for this wedding is so high.

This week has been crazy stressful as Justin and I try to finish the final touches. Justin is still working on bridesmaid dresses and I am trying to finish all of the paper "products" that will be found at the wedding including the programs. I'm not worried about us finishing on time (although maybe I should). I know I have my mom's help (but I also know she is tired of gluing). Don't worry dear friends. I am super excited about the programs, and if you are coming to the wedding -- you should be too! They are my favorite paper product from this whole wedding "experiment".

Today I will try to finish some decorations as well as the maps for the wedding programs. I have quite a bit to finish. Wish me luck!

Reception Excitement!

I am saving a good many of the reception surprises for when friends and family arrive at the reception, but this one surprise is one I simply could not refrain from sharing! Over the weekend, Justin and I obtained the CUTEST camera EVER! All damask and everything, this camera is... exciting!


It is a plastic Diana camera from Urban Outfitters, and I have to say it has (thus far) made all of my photographical dreams come true. The camera is reminiscent of a style made in the 1960's, uses 120mm film, and has absolutely awesome light leaks (and mistakes) that make the photography look unique and artistic (even if the photographer does not know how to shoot!). 

Not only will you find this gorgeous treasure at the reception site with tons of black and white and color film, you will also find one other Diana (with a flash attachment), a plain Holga, and a Holga with a color flash. (SOOOO EXCITING!) We will also probably have some disposable cameras as well. 

Flowers & Decorations

Justin and I have been all over the place in wedding planning in the last month. Recently the planning has been focused on florals.

We knew we had china to help decorate the table. We also knew we were not planning to pay for a florist to decorate our reception. This is when we started buying bunches and bunches of florals.

I started going floral crazy when I saw what I had (2 cherry blossoms per table), but I had no idea how to arrange them or what to put them in. Luckily, I knew someone who did! Once she helped me decide on how to do the main floral arrangements on the tables, I was able to 1. relax and 2. focus my energy on other decorations.

Y'know... like florals for the dessert table...

and... umm... cute things like awesome hangers for the bridesmaids.

I even got so far as to find (kids size) shoes for me to wear with my wedding dress (Shh... I'm not suppose to tell anyone I have tiny feet!) and a fingerprint tree from someone in the UK! I cannot wait until all my friends and family help to create this wonderful piece of art!

Now... on to programs! Wish me luck! (Oh and I still have to finish music.)

Did I mention the two bridal showers planned for this weekend?

Busy, Busy, Busy... Silhouette Cameo Review

I am so excited (and tired) from the crazy week that was last week. Three days of family dinners...!! That is when you know you have a LOT of family! I grew up with at least 2 family dinners, but I felt so bad for Justin since he now has 2 additional dinners that he isn't used to!

On top of that, we took our two bridesmaids with us to all of the dinners as well. We ended the day at Café Intermezzo. :) I could not have asked for a better weekend. It was a very busy weekend though!

As you might could guess, we have not gotten much accomplished with the wedding in the past four days.

Let me just share one exciting wedding detail we have been working on/designing:


Don't you love those? It was Marion's (bridesmaid) idea... I received my Silhouette Cameo toward the middle of December and with it is the option to print butterflies. They are sooo exciting and I am finding them all over my house as they fly from room to room. My aunt suggested that maybe they needed a little bit of sparkle.


Justin decided that perhaps they could be cut out of scrapbook paper and made into confetti. It took him forever to pull all of these butterflies off of the mat, but they look absolutely adorable!

(By the way, I LOVE instagram.)

If you have any interest in getting a "cutting printer", the Silhouette Cameo is absolutely amazing (even though I am still figuring it out). Don't be fooled by the Cricut... try a google search comparing the two and you will find that the Silhouette is far more detailed and a superior product.

For saving money, however, I would encourage you to purchase the Cricut mats to use with the Silhouette. They are cheaper and not quite as sticky as the mat that came with the Silhouette. The lack of stickiness makes the "printed" projects easier to pull off, but I will probably end up taping my paper to the mat so that it doesn't become loose during the cutting process.

I'm Late, I'm Late for a Very Important Date!

Over the weekend, Justin and I realized why it is that most engaged couples just buy everything. It's just easier! We find that most of our weekends are taken up running around trying to obtain all of the things needed for DIY projects, but then we have very little time left over to actually DIY anything. :/

On that note, let me share with you a few of our decoration inspirtation images and some DIY projects we think are awesome!


Dawn + Anthony Wedding; Bobbi and Mike Photography

Click here for a tutorial on how to make these from paper doilies!